1.LinearLayout(线性布局)
注意两个点:
1.orientation 属性:布局中组件的排列方式,有horizontal(水平),vertical(竖直,默认)两种方式。
2.weight 属性:权重属性在屏幕适配时用的比较多(有几种用法可以去百度一下,用一种当 layout_width和layout_height都为match_parent时,可能难理解)
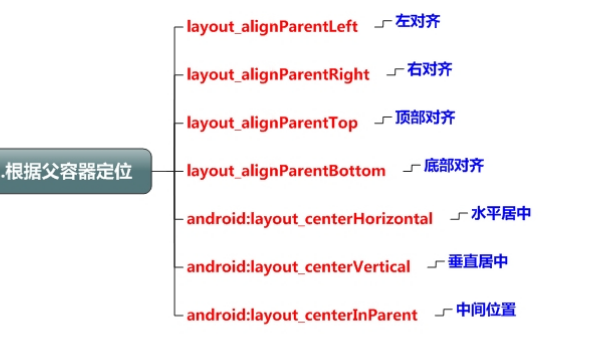
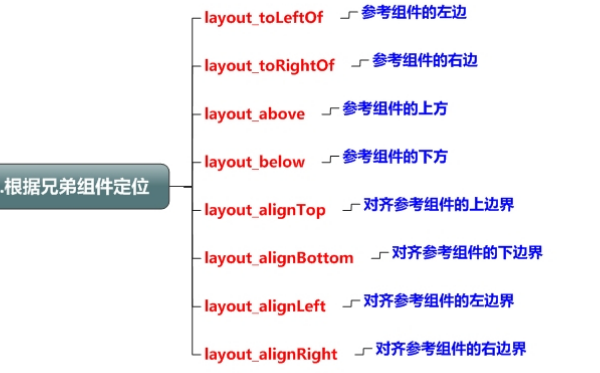
2.RelativeLayout(相对布局)
直接看图,也没啥,还有margin和padding写个简单的梅花布局练练就应该都理解了.
3.TableLayout(表格布局)
这个基本不常用,一般线性+相对布局就可以了,只需要了解一下。
1.如果我们想一行上有多个组件的话,就要添加一个TableRow的容器,把组件都丢到里面.
2.tablerow中的组件个数就决定了该行有多少列,而列的宽度由该列中最宽的单元格决定.
3.tablerow的layout_width属性,默认是fill_parent的,我们自己设置成其他的值也不会生效, 但是layout_height默认是wrapten——content的,我们却可以自己设置大小.
4.整个表格布局的宽度取决于父容器的宽度(占满父容器本身)
5.
1 | android:collapseColumns:设置需要被隐藏的列的序号 |
以上这三个属性的列号都是从0开始算的,比如shrinkColunmns = “2”,对应的是第三列!
可以设置多个,用逗号隔开比如”0,2”,如果是所有列都生效,则用”*”号即可
除了这三个常用属性,还有两个属性,分别就是跳格子以及合并单元格,这和HTML中的Table类似:
android:layout_column=”2”:表示的就是跳过第二个,直接显示到第三个格子处,从1开始算的!
android:layout_span=”4”:表示合并4个单元格,也就说这个组件占4个单元格
eg:1
2
3
4
5
6
7
8
9
10
11
12<TableRow>
<TextView />
<Button
android:layout_width="wrap_content"
android:layout_height="wrap_content"
android:text="登陆"/>
<Button
android:layout_width="wrap_content"
android:layout_height="wrap_content"
android:text="退出"/>
<TextView />
</TableRow>
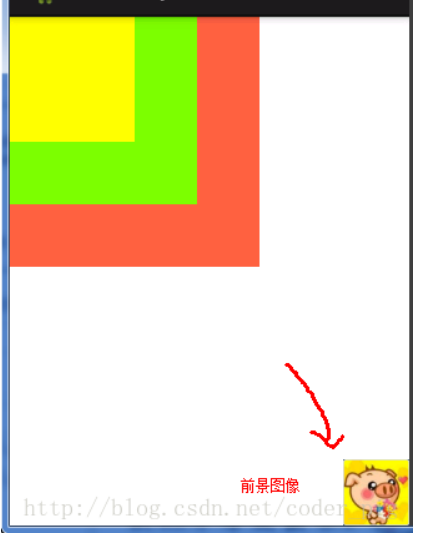
4.FrameLayout(帧布局)
常用属性:1
2android:foreground:设置改帧布局容器的前景图像
android:foregroundGravity:设置前景图像显示的位置
当我们往帧布局里面添加控件的时候,会默认把他们放到这块区域的左上角,而这种布局方式却没有任何的定位方式,所以它应用的场景并不多;帧布局的大小由控件中最大的子控件决定,如果控件的大小一样大的话,那么同一时刻就只能看到最上面的那个组件!后续添加的控件会覆盖前一个!
eg:1
2
3
4
5
6
7
8
9
10
11
12
13
14
15
16
17
18
19
20<FrameLayout xmlns:android="http://schemas.android.com/apk/res/android"
xmlns:tools="http://schemas.android.com/tools"
android:layout_width="match_parent"
android:layout_height="match_parent"
tools:context=".MainActivity"
android:foreground="@drawable/logo"
android:foregroundGravity="right|bottom">
<TextView
android:layout_width="200dp"
android:layout_height="200dp"
android:background="#FF6143" />
<TextView
android:layout_width="150dp"
android:layout_height="150dp"
android:background="#7BFE00" />
<TextView
android:layout_width="100dp"
android:layout_height="100dp"
android:background="#FFFF00" />
</FrameLayout>
5.GridLayout(网格布局)
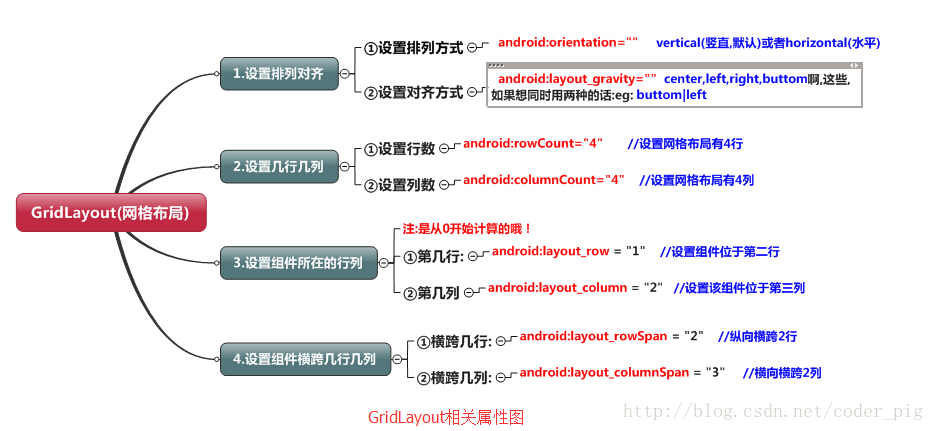
用法:
step 1:先定义组件的对其方式 android:orientation 水平或者竖直,设置多少行与多少列
step 2:设置组件所在的行或者列,记得是从0开始算的,不设置默认每个组件占一行一列
step 3:设置组件横跨几行或者几列;设置完毕后,需要在设置一个填充:android:layout_gravity = “fill”
eg:计算器的清除键占2格1
2
3
4<Button
android:layout_columnSpan="2"
android:layout_gravity="fill"
android:text="清空" />
6.AbsoluteLayout(绝对布局)
这个没啥好说的,基本不用,学java swing时就强调过了
控制大小:1
2android:layout_width:组件宽度
android:layout_height:组件高度
控制位置:1
2android:layout_x:设置组件的X坐标
android:layout_y:设置组件的Y坐标