Android 网络技术

WebView
webView应用内嵌浏览器

布局
1
2
3
4
5
6
7
8
9
10
11
12
13
<LinearLayout xmlns:android="http://schemas.android.com/apk/res/android"
xmlns:app="http://schemas.android.com/apk/res-auto"
xmlns:tools="http://schemas.android.com/tools"
android:layout_width="match_parent"
android:layout_height="match_parent"
tools:context=".Webview">

<WebView
android:layout_width="match_parent"
android:layout_height="wrap_content"
android:id="@+id/web"/>

</LinearLayout>
活动
1
2
3
4
5
6
7
8
9
10
11
12
13
14
public class Webview extends AppCompatActivity {

private WebView webView;
@Override
protected void onCreate(Bundle savedInstanceState) {
super.onCreate(savedInstanceState);
setContentView(R.layout.activity_webview);

webView=findViewById(R.id.web);
webView.getSettings().setJavaScriptEnabled(true); //支持JS脚本
webView.setWebViewClient(new WebViewClient()); //网页跳转时在本控件内进行,而不是打开系统浏览器
webView.loadUrl("https://bilibili.com"); //传入网址
}
}
权限
1
<uses-permission android:name="android.permission.INTERNET"/>
使用Http协议访问网络
HttpURLConnection

Android团队推荐使用HttpURLConnection发送HTTP请求,其步骤如下:

  • 1.获取HttpURLConnection实例:new一个URL对象,调用openConnection()即可
  • 2.用实例设置请求所使用的方法,GET或POST,调用setRequestMethod()
  • 3.自由定制,设置连接超时setConnectTimeout()、读取的毫秒数setReadTimeout()、消息头等等
  • 4.获取输入流,getInputStream()
  • 5.最后关闭连接,disconnect()
Demo 布局
1
2
3
4
5
6
7
8
9
10
11
12
13
14
15
16
17
18
19
20
21
22
<?xml version="1.0" encoding="utf-8"?>
<LinearLayout xmlns:android="http://schemas.android.com/apk/res/android"
android:layout_width="match_parent"
android:layout_height="match_parent"
android:orientation="vertical">

<Button
android:layout_width="match_parent"
android:layout_height="wrap_content"
android:id="@+id/send_request"
android:text="发送请求"/>

<ScrollView
android:layout_width="match_parent"
android:layout_height="match_parent">
<TextView
android:layout_width="match_parent"
android:layout_height="wrap_content"
android:id="@+id/response_text"/>
</ScrollView>

</LinearLayout>
Demo 活动
1
2
3
4
5
6
7
8
9
10
11
12
13
14
15
16
17
18
19
20
21
22
23
24
25
26
27
28
29
30
31
32
33
34
35
36
37
38
39
40
41
42
43
44
45
46
47
48
49
50
51
52
53
54
55
56
57
58
59
60
61
62
63
64
65
66
67
68
69
70
71
72
73
74
75
76
public class Http extends AppCompatActivity implements View.OnClickListener {
private TextView textView;
private Button sendRequest;

@Override
protected void onCreate(Bundle savedInstanceState) {
super.onCreate(savedInstanceState);
setContentView(R.layout.activity_http);

sendRequest = findViewById(R.id.send_request);
textView = findViewById(R.id.response_text);

sendRequest.setOnClickListener(this);
}

@Override
public void onClick(View v) {
switch (v.getId()) {
case R.id.send_request:
sendRequestWithHttpURLConnection();
break;
}
}

private void sendRequestWithHttpURLConnection() {
//开启线程来发起网络请求
new Thread(new Runnable() {
@Override
public void run() {
HttpURLConnection connection = null;
BufferedReader reader = null;

try {
URL url = new URL("https://www.baidu.com");
connection = (HttpURLConnection) url.openConnection();
connection.setRequestMethod("GET");
connection.setConnectTimeout(8000);
connection.setReadTimeout(8000);
InputStream in = connection.getInputStream();
//对获取到的输入流读取
reader = new BufferedReader(new InputStreamReader(in));
StringBuilder response = new StringBuilder();
String line;
while ((line = reader.readLine()) != null) {
response.append(line);
}
Log.d("test", response.toString());
showResponse(response.toString());
} catch (Exception e) {
e.printStackTrace();
} finally {
if (reader != null) {
try {
reader.close();
} catch (Exception e) {
e.printStackTrace();
}
}
if (connection != null) {
connection.disconnect();
}
}

}
}).start();
}

private void showResponse(final String response) {
runOnUiThread(new Runnable() { //切换到主线程
@Override
public void run() {
textView.setText(response);
}
});
}
}
权限
1
<uses-permission android:name="android.permission.INTERNET"/>
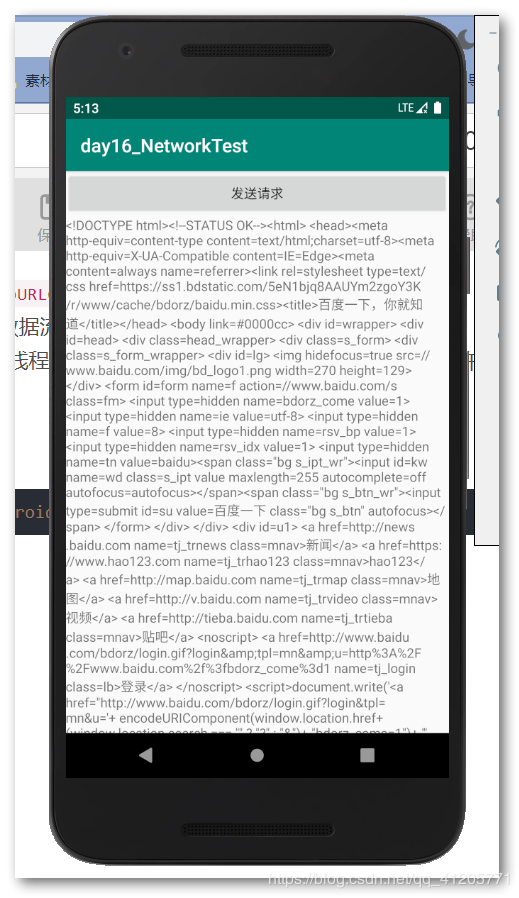
运行

使用Okhttp
地址
1
https://square.github.io/okhttp/
添加依赖
1
2
//okhttp
implementation "com.squareup.okhttp3:okhttp:4.3.1"
用法
  • Request用法:

    • 创建OkHttpClient实例:new OkHttpClient()
    • 创建Request对象:new Request.Builder().url("").build()
    • 调用实例的newCall()创建Call对象,调用execute()发送请求获取数据:Response response = client.newCall(request).execute()
    • 获取返回的内容:response.body().String()
  • Post用法:

    1
    2
    3
    4
    5
    6
    7
    8
    9
    10
    11
    12
    13
    //先构造出一个RequestBody对象来存放待提交的参数
    RequestBody requestBody = new FormBody.Builder()
    .add("username", "admin")
    .add("password", "123456")
    .build();

    //在Request.Build中调用post()方法,并将RequestBody对象传入
    Request request = new Request.Builder()
    .url("")
    .post(requestBody)
    .build()

    //接下来的操作和GET用法一样
项目Code

在前面Http例子的基础上改一下这个方法:

1
2
3
4
5
6
7
8
9
10
11
12
13
14
15
16
17
18
private void sendRequestWithOkHttp() {
new Thread(new Runnable() {
@Override
public void run() {
try{
OkHttpClient client = new OkHttpClient();
Request request = new Request.Builder()
.url("https://baidu.com")
.build();
Response response = client.newCall(request).execute();
String responseData = response.body().string();
showResponse(responseData);
}catch (Exception e){
e.printStackTrace();
}
}
}).start();
}
0%