Bitmap详解

概述

Bitmap图像处理的最重要类之一。用它可以获取图像文件信息,进行图像颜色变换、剪切、旋转、缩放等操作,并可以指定格式保存图像文件

Bitmap类
重要函数
1
2
3
4
5
6
7
8
9
10
11
12
13
14
15
16
17
public void recycle() // 回收位图占用的内存空间,把位图标记为Dead
public final boolean isRecycled() //判断位图内存是否已释放
public final int getWidth()//获取位图的宽度
public final int getHeight()//获取位图的高度
public final boolean isMutable()//图片是否可修改
public int getScaledWidth(Canvas canvas)//获取指定密度转换后的图像的宽度
public int getScaledHeight(Canvas canvas)//获取指定密度转换后的图像的高度

public boolean compress(CompressFormat format, int quality, OutputStream stream)//按指定的图片格式以及画质,将图片转换为输出流。
format:Bitmap.CompressFormat.PNG或Bitmap.CompressFormat.JPEG
quality:画质,0-100.0表示最低画质压缩,100以最高画质压缩。对于PNG等无损格式的图片,会忽略此项设置。

public static Bitmap createBitmap(Bitmap src) //以src为原图生成不可变得新图像
public static Bitmap createScaledBitmap(Bitmap src, int dstWidth, int dstHeight, boolean filter)//以src为原图,创建新的图像,指定新图像的高宽以及是否可变。
public static Bitmap createBitmap(int width, int height, Config config)——创建指定格式、大小的位图
public static Bitmap createBitmap(Bitmap source, int x, int y, int width, int height)以source为原图,创建新的图片,指定起始坐标以及新图像的高宽。
public static createBitmap(Bitmap source, int x, int y, int width, int height,Matrix m, boolean filter)// 倒数第二个是Matrix参数,进行平移、缩放、旋转等操作

AndroidBitamp指的就是一张图片,一般是pngjpeg格式。

Bitmap类中有一个enum类型的Config,其中有4个值:

  • ALPHA_8
    8位位图;1 个字节,只有透明度,没有颜色值
  • RGB_565
    16位位图;2 个字节,r = 5,g = 6,b = 5,一个像素点 5+6+5 = 16
  • ARGB_4444
    16位位图;2 个字节,a = 4,r = 4,g = 4,b = 4,一个像素点 4+4+4+4 = 16
  • ARGB_8888
    32 位位图; 4个字节,a = 8,r = 8,g = 8, b = 8,一个像素点 8 + 8 + 8 + 8 = 32

源码中默认采用ARGB_8888

参数理解:

1
2
3
4
5
6
7
*	@param source   原始 Bitmap
* @param x 在原始 Bitmap 中 x方向的其起始坐标(你可能只需要原始 Bitmap x方向上的一部分)
* @param y 在原始 Bitmap 中 y方向的其起始坐标(你可能只需要原始 Bitmap y方向上的一部分)
* @param width 需要返回 Bitmap 的宽度(px)(如果超过原始Bitmap宽度会报错)
* @param height 需要返回 Bitmap 的高度(px)(如果超过原始Bitmap高度会报错)
* @param m Matrix类型,表示需要做的变换操作
* @param filter 是否需要过滤,只有 matrix 变换操作才有效

理解

一张 1024 * 1024 像素,采用ARGB8888格式,一个像素32位,每个像素就是4字节,占有内存就是4M

若采用RGB565,一个像素16位,每个像素就是2字节,占有内存就是2M。两个开源库Glide和Picasso,

Glide加载图片默认格式RGB565PicassoARGB8888,默认情况下,Glide占用内存会比Picasso低,色彩不如Picasso鲜艳,自然清晰度就低.

BitmapFactory工厂类

Option 参数类:

1
2
3
4
5
6
7
8
9
10
11
12
13
14
15
16
public boolean inJustDecodeBounds//如果设置为true,不获取图片,不分配内存,但会返回图片的高度宽度信息。
public int inSampleSize//采样率
public int outWidth//获取图片的宽度值
public int outHeight//获取图片的高度值
public int inDensity//用于位图的像素压缩比
public int inTargetDensity//用于目标位图的像素压缩比(要生成的位图)
public byte[] inTempStorage //创建临时文件,将图片存储
public boolean inScaled//设置为true时进行图片压缩,从inDensity到inTargetDensity
public boolean inDither //如果为true,解码器尝试抖动解码
public Bitmap.Config inPreferredConfig //设置解码器
public String outMimeType //设置解码图像
public boolean inPurgeable//当存储Pixel的内存空间在系统内存不足时是否可以被回收
public boolean inInputShareable //inPurgeable为true情况下才生效,是否可以共享一个InputStream
public boolean inPreferQualityOverSpeed //为true则优先保证Bitmap质量其次是解码速度
public boolean inMutable //配置Bitmap是否可以更改,比如:在Bitmap上隔几个像素加一条线段
public int inScreenDensity //当前屏幕的像素密度

参数 inSampleSize 的理解:

这个是读取bitmap时用到的属性,是为了对原图降采样

比如原图是一个 4000 4000 点阵的图,占用内存就是 4000 4000 单个像素占用字节数
单个像素占用字节数取决于你用的是 RGB565, ARGB8888 等. 4000
4000 这个解析度已很接近目前市面主流机器的默认照片解析度.
假设你用的是RGB565解析这张图,那一个点就占用2个字节.如果完整解析这个图片,就需要 大约3.2MB的内存.
如果你用了一个GridView,同时显示了30张这种图,那几乎可以确定你会收到一个OOM异常.

所以需要对这种大图进行降采样,以减小内存占用.毕竟拇指大小的地方根本用不着显示那么高的解析度.
因为直接从点阵中隔行抽取最有效率,所以为了兼顾效率, inSampleSize 这个属性只认2的整数倍为有效.
比如你将 inSampleSize 赋值为2,那就是每隔2行采1行,每隔2列采一列,那你解析出的图片就是原图大小的1/4.
这个值也可以填写非2的倍数,非2的倍数会被四舍五入,向下寻找2的整数次幂.

综上,用这个参数解析bitmap就是为了减少内存占用.

inSampleSize的默认值和最小值为1(当小于1时,解码器将该值当做1来处理)

那如何设置 inSampleSize 呢?

1
2
3
4
5
6
7
8
9
10
11
12
13
14
15
16
17
18
19
20
21
22
23
/**
* @description 计算图片的压缩比率
*
* @param options 参数
* @param reqWidth 目标的宽度
* @param reqHeight 目标的高度
* @return
*/
private static int calculateInSampleSize(BitmapFactory.Options options, int reqWidth, int reqHeight) {
// 源图片的高度和宽度
final int height = options.outHeight;
final int width = options.outWidth;
int inSampleSize = 1;
if (height > reqHeight || width > reqWidth) {
// 计算出实际宽高和目标宽高的比率
final int halfHeight = height / 2;
final int halfWidth = width / 2;
while ((halfHeight / inSampleSize) > reqHeight && (halfWidth / inSampleSize) > reqWidth) {
inSampleSize *= 2;
}
}
return inSampleSize;
}

看一下insampleSize的效果

1
2
3
4
val bitmap = BitmapFactory.decodeResource(resources,R.drawable.img_002)
Log.d("bitmap",""+bitmap.width+" "+bitmap.height) //原图大小
val bitmap2 = decodeBitmap(resources,R.drawable.img_002,250,360)
Log.d("bitmap2",""+bitmap2.width+" "+bitmap2.height) // 使用了InsimpleSize,这里为4 看下图

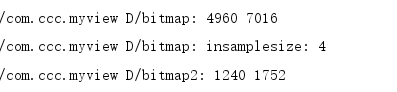
可见,当inSampleSize大小为4时,得到的bitmap宽高都为原来的1/4

参数inpreferredconfig理解:

如果inPreferredConfig不为null,解码器会尝试使用此参数指定的颜色模式来对图片进行解码,如果inPreferredConfig为null或者在解码时无法满足此参数指定的颜色模式,解码器会自动根据原始图片的特征以及当前设备的屏幕位深,选取合适的颜色模式来解码,例如,如果图片中包含透明度,那么对该图片解码时使用的配置就需要支持透明度,默认会使用ARGB_8888来解码。
也就是说inPreferredConfig指定的配置并非是一个强制选项,而是建议的(preferred)选项,Android在实际解码时会参考此参数的配置,但如果此配置不满足,Android会重新选取一个合适的配置来对图片进行解码。

这里说明一下,网上存在一种说法,设置RGB565选项可以减少内存。经过实际的分析,基本上指定inPreferredConfig为RGB565和不设置inPreferredConfig的效果是一样的。

工厂方法:

1
2
3
4
5
6
7
8
9
10
public static Bitmap decodeFile(String pathName, Options opts) //从文件读取图片 
public static Bitmap decodeFile(String pathName)
public static Bitmap decodeStream(InputStream is) //从输入流读取图片
public static Bitmap decodeStream(InputStream is, Rect outPadding, Options opts)
public static Bitmap decodeResource(Resources res, int id) //从资源文件读取图片
public static Bitmap decodeResource(Resources res, int id, Options opts)
public static Bitmap decodeByteArray(byte[] data, int offset, int length) //从数组读取图片
public static Bitmap decodeByteArray(byte[] data, int offset, int length, Options opts)
public static Bitmap decodeFileDescriptor(FileDescriptor fd)//从文件读取文件 与decodeFile不同的是这个直接调用JNI函数进行读取 效率比较高
public static Bitmap decodeFileDescriptor(FileDescriptor fd, Rect outPadding, Options opts)

重点说明

在不配置Options的情况下:

1、decodeFile、decodeStream在解析时不会对Bitmap进行一系列的屏幕适配,解析出来的将是原始大小的图

2、decodeResource在解析时会对Bitmap根据当前设备屏幕像素密度densityDpi的值进行缩放适配操作,使得解析出来的Bitmap与当前设备的分辨率匹配,达到一个最佳的显示效果,并且Bitmap的大小将比原始的

看一下用decodeResource解析出来的和原图的对比

图片操作

1.获取图片长宽

1
2
3
4
5
6
7
8
val options = BitmapFactory.Options()
//如果设置为true,不获取图片,不分配内存,但会返回图片的高度宽度信息。
options.inJustDecodeBounds = true
BitmapFactory.decodeResource(context.resources,R.drawable.peitu03,options)
val srcWidth = options.outWidth
val srcHeight = options.outHeight
Log.d("test","宽:"+srcWidth+" 高:"+srcHeight)
//test: 宽:198 高:151

2.对图片进行缩放

1
2
3
4
	val matrix = Matrix()
matrix.postScale(0.5f,0.5f)
val bitmap = Bitmap.createBitmap(bitmap2,0,0,500,400,matrix,true)
//得到 250*200大小的

3.简单的压缩处理

我这里有一张6m左右的图片,按照正常的加载bitmap,程序肯定加载不出来,因为图片过大

1
2
3
4
5
//直接加载,报错
val bitmap = BitmapFactory.decodeResource(this.resources,R.drawable.img_009)
iv.setImageBitmap(bitmap)

//报此异常 trying to draw too large(463147136bytes) bitmap

因此,为了能让图片加载出来,我们可以对图片进行简单的压缩处理,这里就要用到前面讲的那个Options的参数 inSampleSize

1
2
3
4
5
6
7
8
9
10
11
12
13
14
15
16
17
18
19
20
21
22
23
24
25
26
27
28
29
30
31
32
33
34
35
36
val bitmap = decodeBitmap(this.resources,R.drawable.img_009,400,600)
iv.setImageBitmap(bitmap)

//对图片进行简单的压缩处理
fun decodeBitmap(res: Resources,resId: Int,targetWidth: Int,targetHeight: Int): Bitmap {
Log.d("bitmap","参数宽高"+targetWidth+" "+targetHeight)
val options = BitmapFactory.Options()
options.inJustDecodeBounds = true
BitmapFactory.decodeResource(res,resId,options)
options.inSampleSize = calculateInSampleSize(options,targetWidth,targetHeight)
Log.d("bitmap","insamplesize: "+options.inSampleSize)
options.inJustDecodeBounds = false
return BitmapFactory.decodeResource(res,resId,options)
}

//取得合适的InSampleSize的值
fun calculateInSampleSize(
options: BitmapFactory.Options,
reqWidth: Int,
reqHeight: Int
): Int {
val width = options.outWidth
val height = options.outHeight
var inSampleSize = 1
if (height > reqHeight || width > reqWidth) {
//计算图片高度和我们需要高度的最接近比例值
val heightRatio =
Math.round(height.toFloat() / reqHeight.toFloat())
//宽度比例值
val widthRatio =
Math.round(width.toFloat() / reqWidth.toFloat())
//取比例值中的较大值作为inSampleSize
inSampleSize = if (heightRatio > widthRatio) heightRatio else widthRatio
}
return inSampleSize
}

可见可以加载出来了:

几个方法

1.compress方法

构造方法:

compress(Bitmap.CompressFormat format, int quality, OutputStream stream)

bitmap数据质量压缩并转换成流,若format参数设置为了png格式,quality设置无效

  • format 图片的格式,支持3种JPEG,PNG,WEBP
  • quality 压缩质量压缩率,0-100,0表示压缩程度最大,100为原质量,但png无效
  • stream 输出流
  • 返回值,boolean

简单使用

1
2
3
4
5
6
7
8
9
10
11
12
13
14
15
16
17
18
19
20
21
22
23
24
25
26
int count = image.getWidth() * image.getHeight() / 1024;
Log.d("bitmap:compress", "压缩前:" + count);
ByteArrayOutputStream bout = new ByteArrayOutputStream();

// 质量压缩方法,这里100表示不压缩,把压缩后的数据存放到baos中
image.compress(Bitmap.CompressFormat.JPEG, 50, bout); //修改第二个参数
count = image.getWidth() * image.getHeight() / 1024;

Log.d("bitmap:compress", "压缩后:" + count);
Log.d("bitmap:compress", "压缩后:" + bout.toByteArray().length / 1024);

运行以上代码--输出:

压缩前 85

压缩后 85

压缩后 24 --

如果将第二个参数50改为10 则会

压缩前 85

压缩后 85

压缩后 13 --

可以发现bitmap基本上没有被压缩,因为我们一开始就提到了compress压缩是存储压缩,不是内存压缩,所以在内存中并没有改变大小,但bytes本身变小了,适合存储和传输!

这种压缩方法之所以称之为质量压缩,是因为它不会减少图片的像素。它是在保持像素的前提下改变图片的位深及透明度等,来达到压缩图片的目的。进过它压缩的图片文件大小会有改变,但是导入成bitmap后占得内存是不变的。因为要保持像素不变,所以它就无法无限压缩,到达一个值之后就不会继续变小了。显然这个方法并不适用与缩略图,其实也不适用于想通过压缩图片减少内存的适用,仅仅适用于想在保证图片质量的同时减少文件大小的情况而已。

2.copy方法

构造方法:

copy(Bitmap.Config config, boolean isMutable)

拷贝一个Bitmap的像素到一个新的指定信息配置的Bitmap

  • config 配置信息
  • isMutable 是否支持可改变可写入
  • 返回值,bitmap,成功返回一个新的bitmap,失败就null
1
2
Bitmap bitmap =  BitmapFactory.decodeResource(getResources(),R.drawable.m);
bitmap = bitmap.copy(Bitmap.Config.RGB_565,true);
0%